Modell Aachen provides a pre-configured Q.wiki Copilot agent as a ZIP file. You import it, connect it to your Q.wiki instance, and share it with your users. The agent is pre-configured according to our best practice – everything can be adjusted after import.
Prerequisites
A Global Admin handles the entire setup – end users do not need their own license. Usage is billed via existing Microsoft 365 Copilot licenses or Copilot Credits.
| Area | Requirement |
|---|---|
| Q.wiki | The "API / MCP" add-on module is booked – the MCP Server runs automatically once active (see Q.wiki MCP Server – Overview & Endpoint). |
| Microsoft – Admin performing setup | Global Administrator – performs steps 1–8 of this guide. The admin also needs the free Copilot Studio User License (assigned in the M365 Admin Center). |
| Microsoft – End users & costs | End users do not need their own Copilot license. Users with a full Microsoft 365 Copilot license (add-on) use the agent at no additional cost; all others consume Copilot Credits (external) from the Copilot Studio Tenant License (Capacity Pack or Pay-as-you-go). |
Download
Download the pre-configured agent and import it in step 1.
Step 1: Import the solution
The ZIP is a ready-made Power Platform solution – the Q.wiki Assistant is already included as an agent component. You do not need to create a new solution; simply import the ZIP via the Solution Explorer.
- Sign in to copilotstudio.microsoft.com (external) and select the environment in the top-right corner where you want to deploy the agent.
- In the left navigation, click Solutions. If the icon is not immediately visible, expand it via the "…" (More) menu at the bottom of the sidebar.
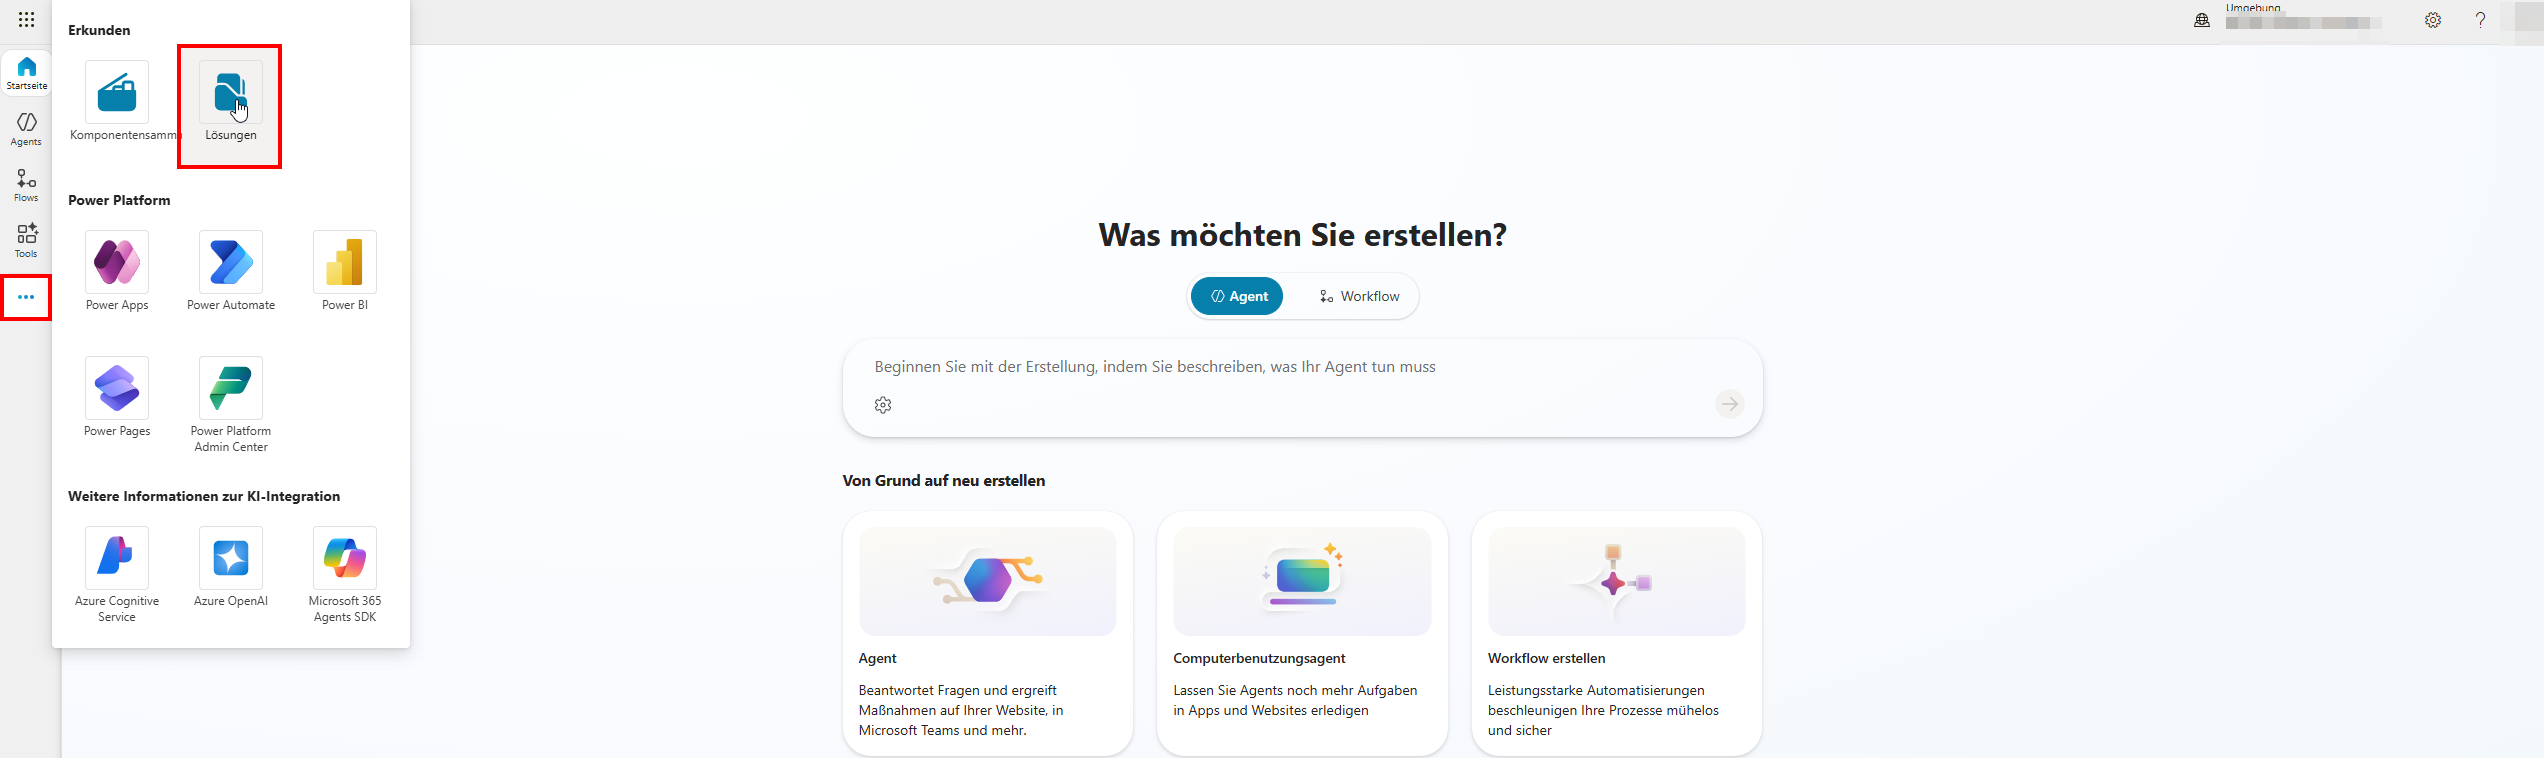
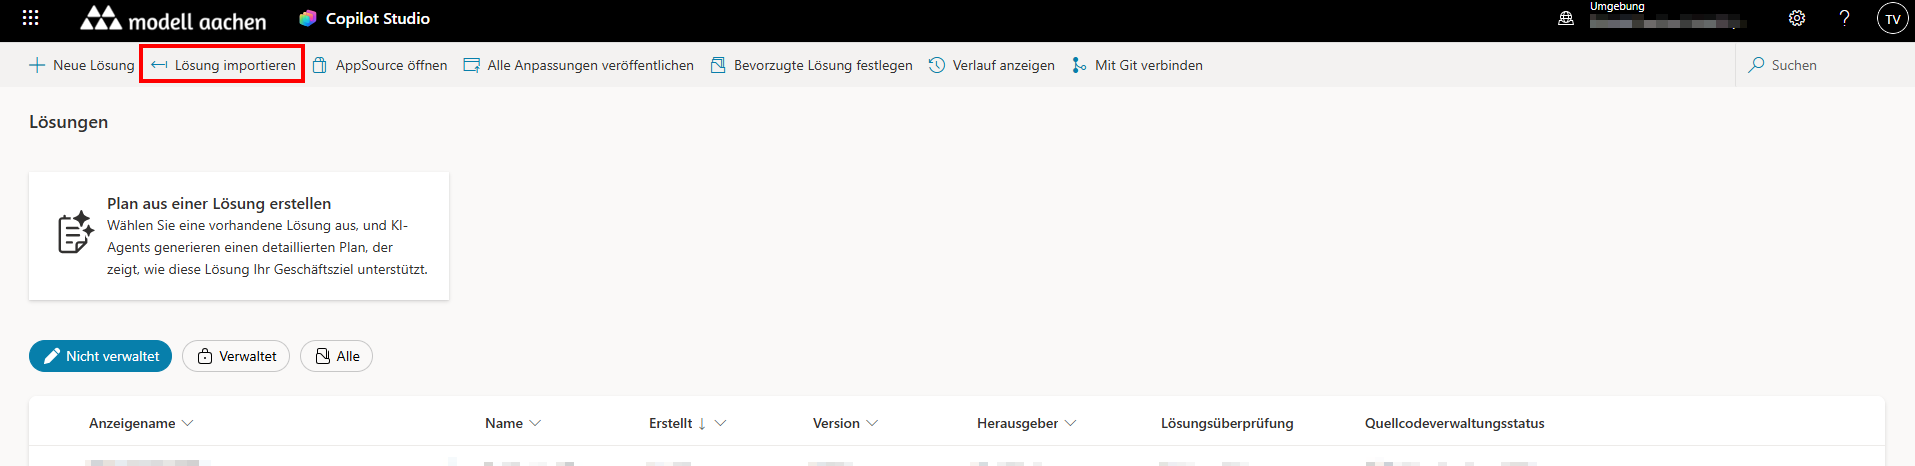
- Click Import solution in the toolbar at the top.
- In the import dialog: click Browse → select the ZIP → click through the wizard with Next until you reach Import. If the wizard asks for Connection References or Environment Variables, leave them blank – the Q.wiki MCP connection is set up separately in step 3.
- Monitor the status via the bell icon in the top right – the import runs in the background for 1–5 minutes. Wait for the "Successful" banner.
Step 2: Open and verify the agent
- In the Solution Explorer, click the solution you just imported.
- In the Objects panel on the left, click Agents.
- Click "Q.wiki Assistant" – it opens in Copilot Studio.
Step 3: Add the Q.wiki MCP tool
The MCP connection is tenant-specific and is therefore intentionally not included in the ZIP. You create it once in your tenant. In the agent, open the Tools tab and select Add a tool → New tool → Model Context Protocol.

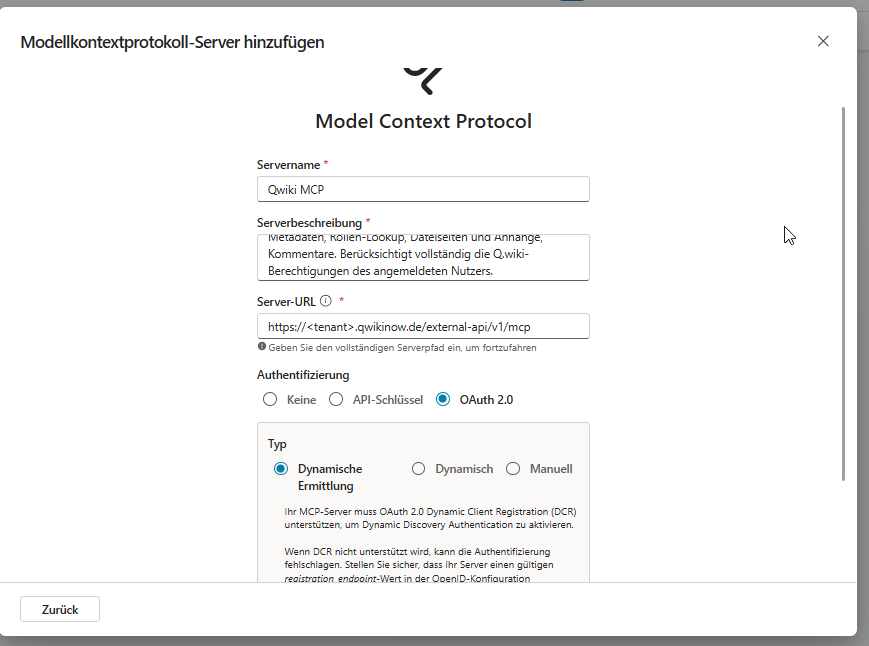
In the "Add Model Context Protocol server" dialog, enter the following values:
| Field | Value |
|---|---|
| Server name | Qwiki MCP (periods are not allowed in server names) |
| Server description | Access to process knowledge from the Q.wiki management system – full-text search, page retrieval with metadata, role lookup, file pages and attachments, comments. Fully respects the Q.wiki permissions of the signed-in user. |
| Server URL | https://<tenant>.qwikinow.de/external-api/v1/mcp (replace with your tenant name – find the URL in Q.wiki under My Account > My Profile > Content API) |
| Authentication | OAuth 2.0 → Type Dynamic discovery |
Click Create. The "Add tool" dialog opens with two steps:
- Connection: Select "Create a new connection" → sign in with your Q.wiki account in the OAuth pop-up (no password required with Entra SSO).
- Add to agent: confirm after successful login.
The tool appears in the tab with status "Connected".
For more details on the MCP onboarding wizard in Microsoft: Connect your agent to an existing MCP server (external).
Step 4: Test the agent
Click Test in the top right to open the test panel. Ask a question whose answer you can verify in your Q.wiki – for example about a process, a role, or a work instruction. The following three criteria should be met:
- The Q.wiki tool is visibly called in the activity log.
- At the end of the response, a "Sources from Q.wiki:" block appears with links to the pages used.
- The content of the answer matches the actual content in your Q.wiki.
Step 5: Publish the agent
- Click Publish in the top right of the agent.
- Click Publish again in the confirmation dialog.
- Status changes to "Published by …".
Step 6: Add the "Microsoft 365 and Microsoft Teams" channel
To make the agent available in Microsoft 365 Copilot and Teams, add the combined channel.
- In the agent, switch to the Channels tab at the top.
- Click the "Microsoft 365 and Microsoft Teams" tile.
- In the side panel under "Turn on Microsoft 365", the checkbox "Make agent available in Microsoft 365 Copilot" is active by default – leave it as is.
- Click Add channel in the bottom right.
- Wait for the confirmation status message.


Step 7: Submit for approval
After adding the channel, the "Availability options" button appears in the side panel. Use it to request that the agent be published in Microsoft 365 Copilot and your organization's Teams app store.
- Click Availability options in the same side panel.
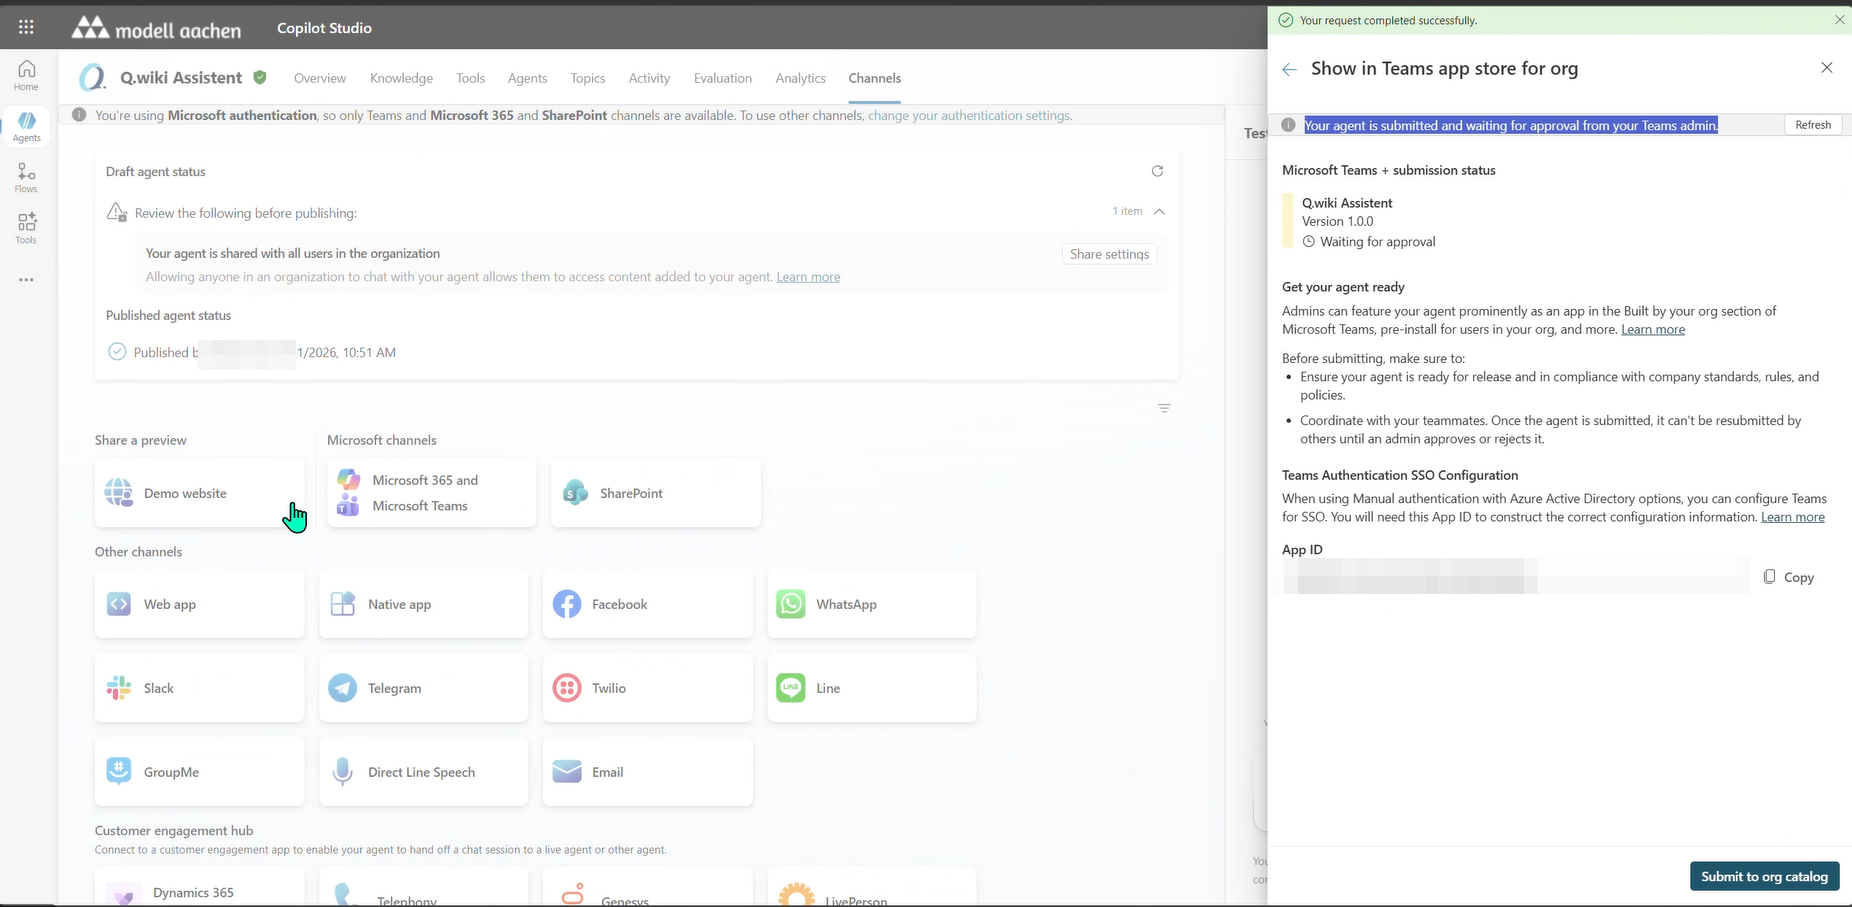
- The "Show in Teams app store for org"panel opens. Work through the following sections:
- Microsoft Teams + admin status: shows version and approval status – switches to "Waiting for approval" once you have submitted.
- Set your agent reach: confirms that the agent will be made available in all supported channels – no selection needed.
- Before submitting, make sure you've …: pre-submit checklist – agent recently published (step 5 ✓), authentication configured (already set in the ZIP ✓).
- Teams Authentication SSO Configuration: shows the App ID of your agent. Copy it using the copy icon – the admin uses it in step 8 to uniquely identify the agent.
- Click Submit to org catalog in the bottom right.
- Status changes to "Your agent is submitted and waiting for approval from your Teams admin".
Step 8: Approve in the Admin Center & set the audience
The approval request is waiting in the Microsoft 365 Admin Center (external). Here you decide who can install the agent and who receives it automatically.
- Open admin.microsoft.com (external).
- Sidebar: Agents → All agents → tab Requests.
- Click Q.wiki Assistant in the list – the detail panel opens on the right. (If there are multiple pending agents, use the App ID copied in step 7 to identify the correct one.)
- Click Publish to store in the top right.

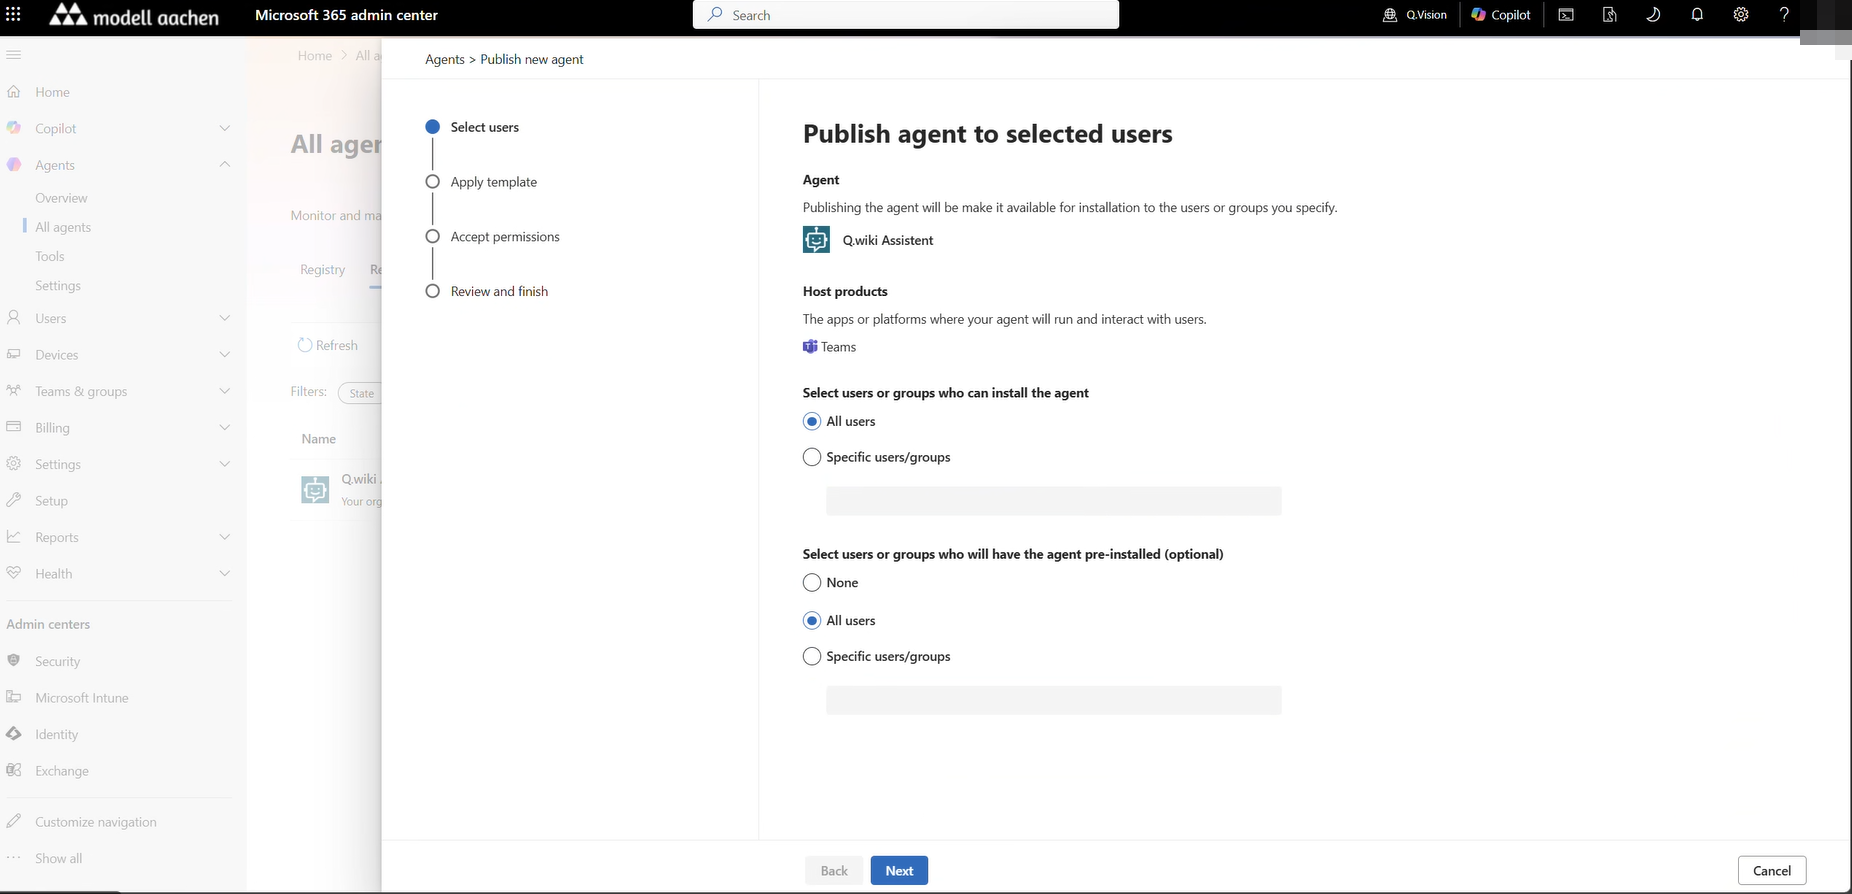
The "Publish agent to selected users" wizard opens:
- Select users– two selection areas:
- Select users or groups who can install the agent: All users for the entire tenant or Specific users/groups for a pilot group.
- Select users or groups who will have the agent pre-installed (optional): All users = automatic pinning in Teams; None = users install it themselves.
- Apply template – select a security and privacy policy template.
- Accept permissions – confirm admin consent for the API permissions required by the agent.
- Review and finish – review the summary and complete with Finish.

Step 9: For end users – finding and using the agent
After approval (allow up to 24 hours – see Troubleshooting), your users can open the agent in two places.
In Microsoft 365 Copilot
- Open Microsoft 365 Copilot – via m365.cloud.microsoft/chat (external), the Microsoft 365 Copilot app, or Copilot in Teams.
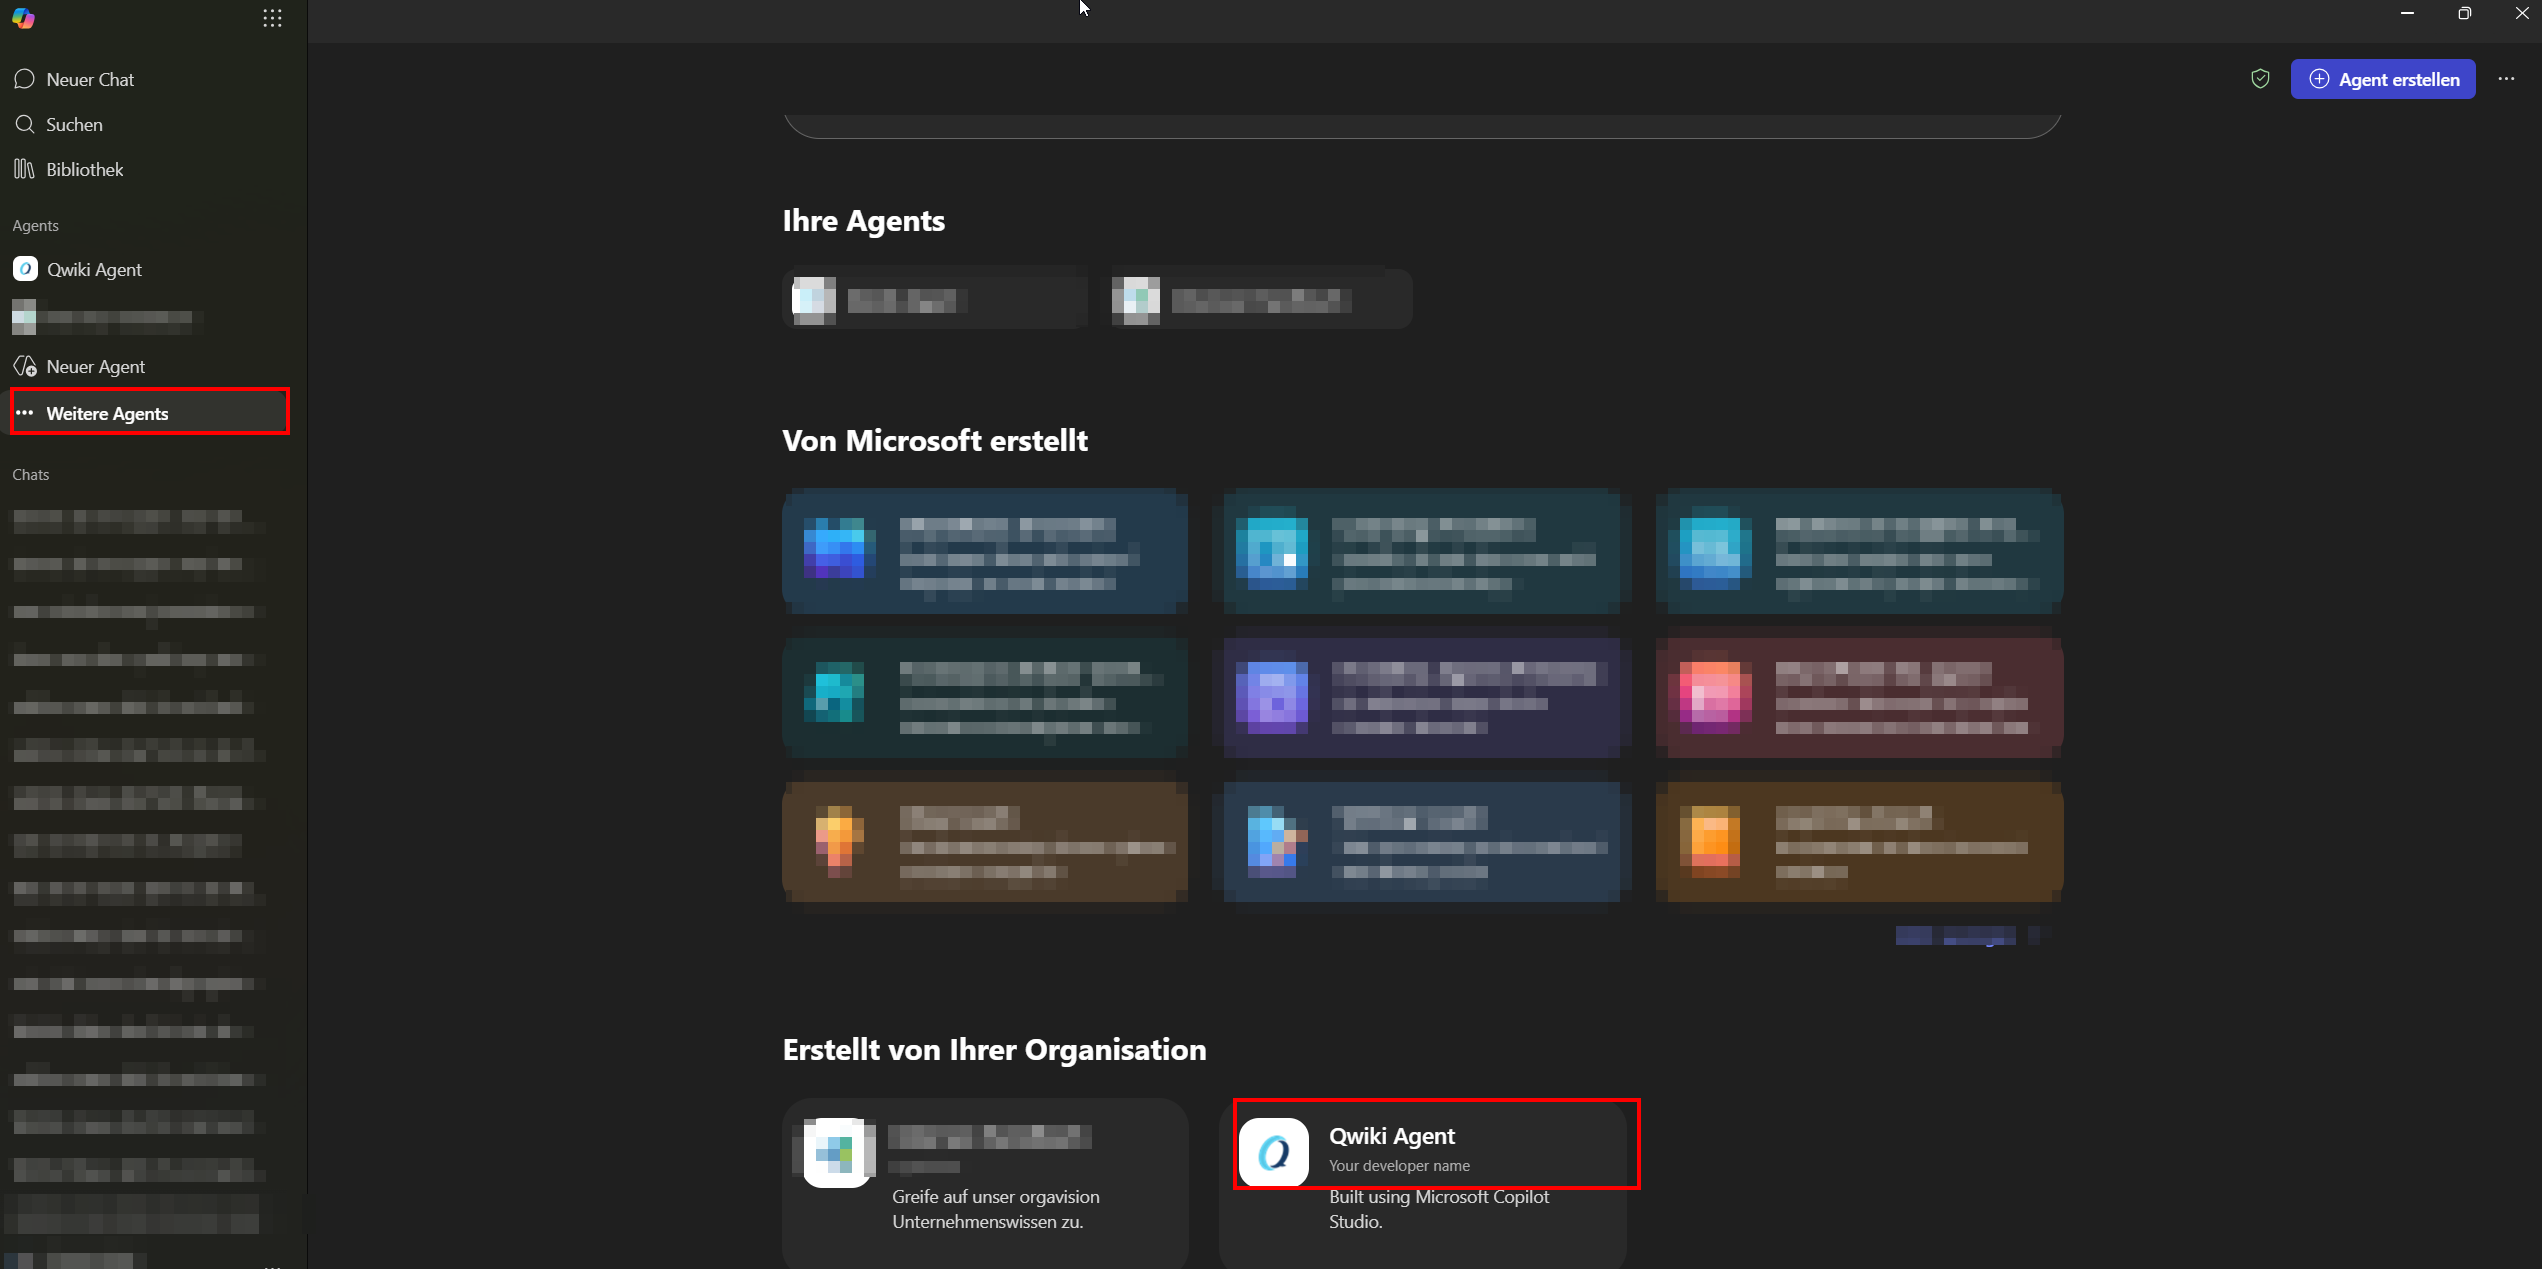
- In the sidebar under Agents, click the Q.wiki agent. If it is not yet listed there, click More agents – in the Agents store it appears under "Built by your organization".
In Microsoft Teams
- In Teams, click Apps on the left, search for "Q.wiki Assistant" (section "Built for your org"), and select Add. If you chose Pre-installed: All users in step 8, this step is not needed – the agent is already pinned in the Teams sidebar.
- The agent appears in the chat area and can be messaged like a contact.
First use: connecting to Q.wiki
On the first question, the agent prompts the user to sign in. Each user signs in once with their own Q.wiki account (no password required with Entra SSO). After that, they can start asking questions straight away – the included conversation starters are a good entry point.
Troubleshooting
| Problem | Solution |
|---|---|
| Solution is empty after import | Insufficient permissions. Request Global Administrator rights, then delete the solution and re-import. |
| Agent not in the list | In make.powerapps.com → Solutions → imported solution → click the agent component directly. |
| Claude Sonnet model not in the dropdown | Admin must enable "Anthropic LLM" in the M365 Admin Center, as well as external models ("Turn on external models") and "Move data across regions" in the Power Platform Admin Center. Alternative: select GPT-4.1 as the default. |
| OAuth sign-in fails | Allow browser pop-ups; confirm the Q.wiki account is active; recreate the OAuth connection in the tool. |
| "Add tool" dialog missed / tool not attached to agent | After "Create", a second dialog appears with "Create a new connection" and "Add to agent". Both steps are required – otherwise the tool is created but not linked to the agent. |
| Tool is not called during testing | Hard reload the browser (Ctrl+Shift+R). If the issue persists, recreate the tool connection. |
| Responses are incomplete | Check permissions – the agent only sees content the user is permitted to access in Q.wiki. |
| "Server URL not reachable" | The API/MCP module must be booked and active. Also verify the tenant name in the URL. |
| End users cannot see the agent in Teams / Copilot | Has Publish been completed in Copilot Studio? Is the channel active and approved? Teams caches aggressively – signing out and back in or pressing Ctrl+Shift+R usually helps. After admin approval, it can take up to 24 hours for the agent to become visible to all users. |
Related articles
Was this article helpful?
That’s Great!
Thank you for your feedback
Sorry! We couldn't be helpful
Thank you for your feedback
Feedback sent
We appreciate your effort and will try to fix the article